 My next step in my preparations for prepping is to increase my skills, and of course to utilize those skills.
In the past I have tried my hand at canning/jarring, but I had only used the water bath method for cranberry jelly at holiday time.
In an effort to maximize dollars spent for food storage – not to mention having ready mead food I like on hand – I’ve begun learning the art of pressure canning.
Now, I don’t know about your local area, but here on the Texas Gulf Coast you can buy all the canning supplies you need at your local grocery store. Actually, I’ve noted the smaller the store the bigger the canning section. Price wise, however, chains like Krogers and Walmart can get you started cheaper. Hold up! The cheapest way to get started is to ask around. Lots of people either do, or have done, canning and have the more expensive supplies on hand. My MIL had a pressure canner on hand that she only uses in the fall, and she was more than willing to let me borrow it until I had the money/ found one I liked. This way my investment was under $20 to get a case of wide mouth quart jars and a tool kit with a jar puller, funnel, and magnet for getting the jar lids out of the hot water.
After I got started I even found a few ladies at church who had some extra jars they were willing to give me in exchange for a pint of my now famous pintos (recipe to follow).
Next, I went to my local library and picked up a few books on canning. Most seem to focus on recipes for jams and jellies (water bath method) but, I found a few that had good pictures and details on pressure canning. It was also interesting to understand how the process works. It gives you a good respect for why steps shouldn’t be skipped. Since their are also LOTS of websites that go in to details on the subject I will not do that here.
Now, to decide what to can! Do to a recent illness (I am terribly susceptible to strep throat – more on alternate antibiotic options as I learn it!) my husband was let loose on my defenseless kitchen. He decided to make goulash (ok) and try using my beloved pressure cooker for the first time (not ok). Overfilled it, not enough water, used pasta, and I had half an inch of burn to clean up once I was ambulatory (sigh). So! I decided I’d can something that my entire family likes that can make a quick meal if I’m not available to cook. Who needs a Zombie Apocalypse when strep can take you down without a shot fired?
Of course, my decision to make pintos turned out to be one of the more difficult choices available! There are plenty of recipes for plain pintos – but that won’t do. The problem with pintos is that you want them cooked enough ( and flavored well) but you don’t want mush once you’ve factored in the cook time of the canning process.
Since my regular pressure cooker was out of order (it took almost a week to get that scorch out!) I used a regular pot and guesstimated how long to cook it. Here’s how I did it:
1. Take a 1 lb bag of unflavored pintos. Wash them to make sure there are no rocks (rare nowadays but it does happen) and put them in a six quart pot with a bunch of water. Boil for about five minutes then let sit for 45 min to an hour. Drain them and put about 8 Cups of water back in the pot with the beans (supposedly this step helps lower the TOOT factor).
2. Add:
1 onion chopped in large chunks
2 lb Ham steak cut into 1 inch and smaller squares
3 slices of bacon grilled in small pieces
1 Tbs chopped garlic
1/2 tsp Hickory Smoked Salt ( if they don’t have it at your local grocery store it can be found online.)
1/2 tsp dried basil
1 tsp Oregano
1/2 tsp old bay seasoning
3. Boil for about 45 minutes. Beans should still be firm. Think aldente, not crunchy.
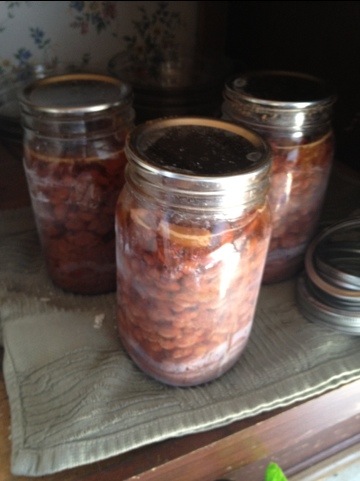
My pot filled 3 quart size jars (next time will be a larger batch now that I know it came out right). Fill, but leave one inch of head room. Add lids and screw tops.
Place in canner and pressurize at 10# for 90 minutes. Refer to classic canning directions on how to do this in your canner.
The next night, after the jars had cooled for 24 hrs, we opened up a jar. We needed to add a little water to get enough juice to have the consistency we prefer, but the texture and gravy were perfect!
Since then I’ve also taken advantage of a sale on chicken quarters. A 10 lb bag (after cooking and deboning) filled 5 pint wide mouth jars. That’s about perfect to add a jar to a pasta dinner or to chop and make chicken salad sandwiches.
As a final note: my husband makes great goulash in a slower cooker and is a great with the smoker/grill.
Hope you enjoy! And feel free to add feedback comments!


